Last night I went to see Magic Mike with a big group of fabulous ladies that I used to work with at the bookstore. In case you live under a rock:
So as you can see it's a movie that is loosely based on Channing Tatum's stint as a male stripper. Ladies, go for the dancing, the cute boys, and the music. But don't expect the ending to blow your mind. There was a collective "what the...?" as the credits came up. That being said, I did truly enjoy the movie. It was what I expected it to be. And Channing Tatum had LOTS of screen time :)
There were about 5 guys in the whole theatre and it was PACKED lol
Me & L, waiting for the show to start :)
Photo credit to Tay, ninja picture-taker extraordinaire!
Photo credit to Tay, again.
After the movie we popped over to Tim Horton's to have a chat, and it was so great to catch up with the girls! That's one group of coworkers I truly miss being part of. And if the night wasn't great enough on it's own, our organizer Tay (you can see her blog post about last night here) somehow arranged fireworks to go off as we were enjoying our sweets! (Actually they were going off in the Crossing for the kick off of the Canada Day festivities, but I'm totes giving Tay credit for that one :p )
Fireworks!
Thanks for a fabulous night, ladies! I had a blast!
I've noticed lately while cleaning that I have amassed a large-ish collection of those 3D glasses you get when you go to the movies. I know, I know: "But you're supposed to RETURN those when the movie's done!!" Well I don't. I figure if I have to pay an arm and a leg to see a movie, I'm damn well going home with a parting gift!
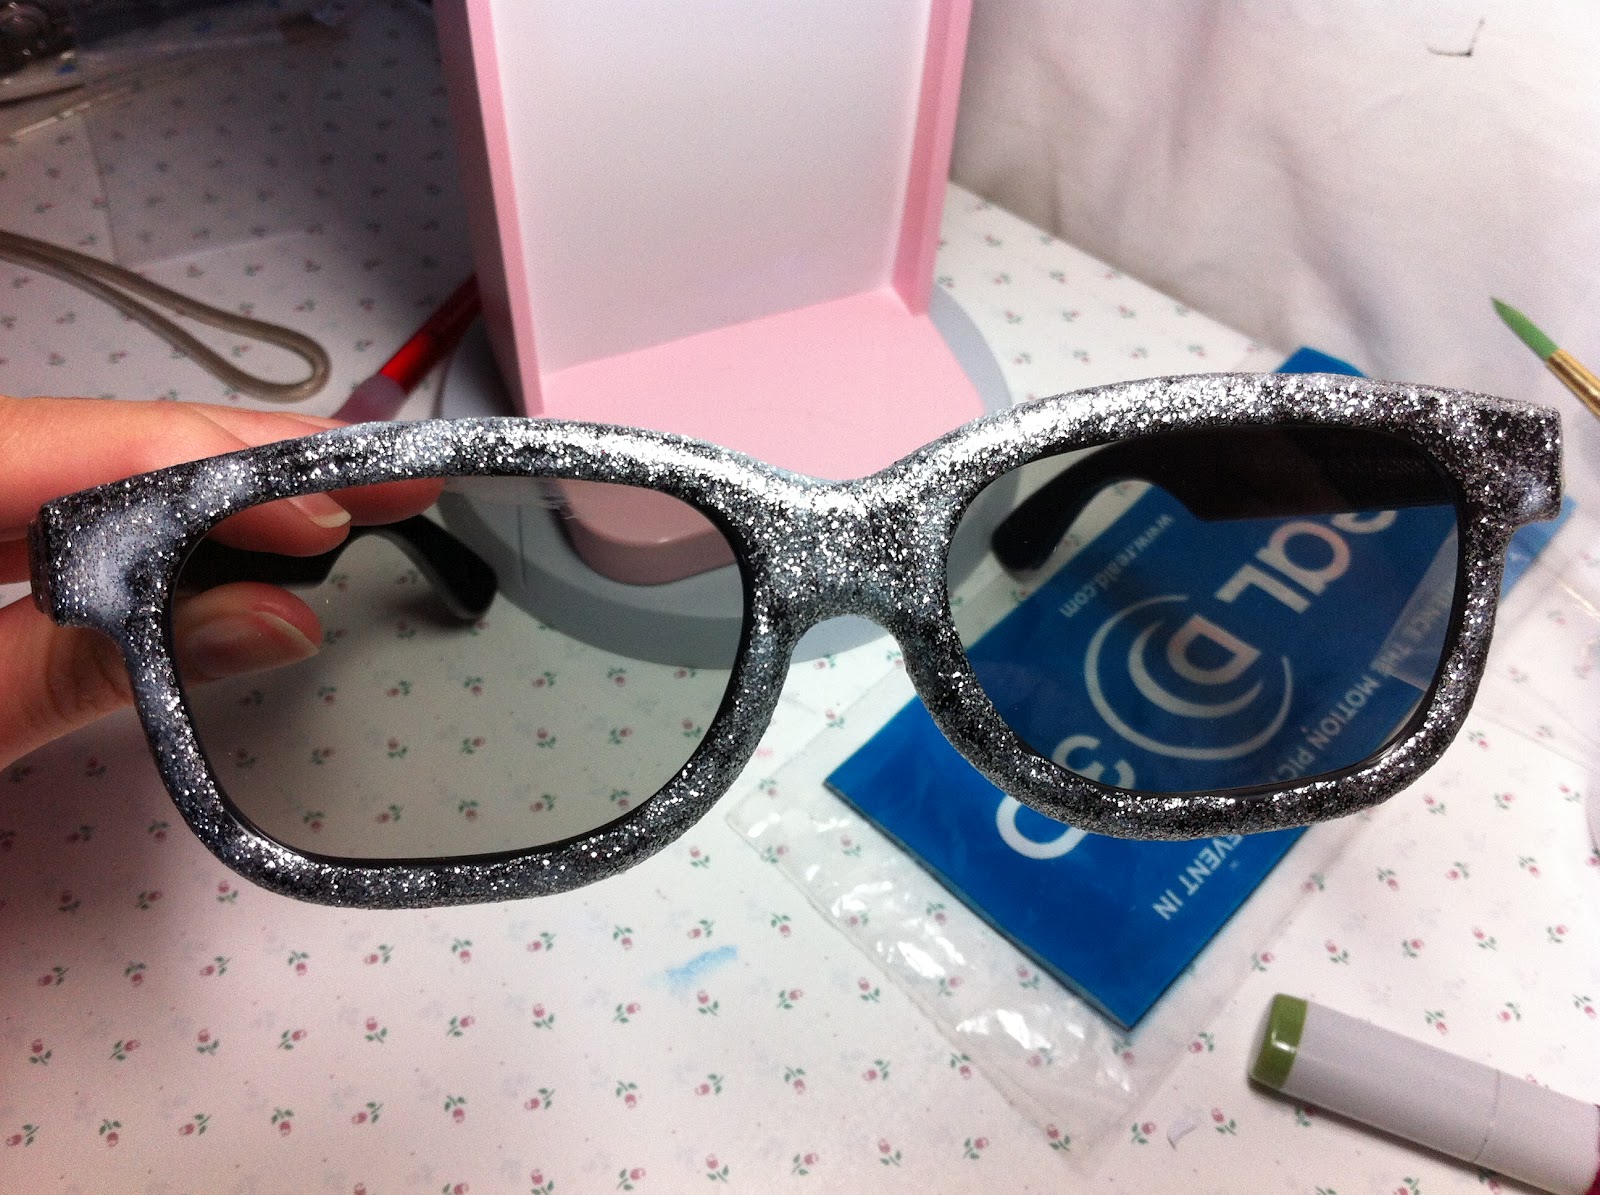
Well, the eco-friendly part of me had a FAB idea: Why don't I take those glasses and bling them out and REUSE them! That way I don't have to take anymore when I go to the movies, the ones I did take will get used again, AND mine will be the envy of ALL in the theatre! Win-Win-WIN!
How to Bling-out your 3D Movie Specs!
Supplies:
~ 3D Movie Glasses, mine are 'Real D 3D'
~ Decoupage Finish (Modge Podge, etc), I used Plaid brand
~ Really fine glitter, I used Martha Stewart in Sterling
~ Sponge brush
~ Plastic container
Step 1:
Pour a small amount of decoupage finish in your container. I didn't measure it out, but I didn't use a lot, probably about 1/4 cup. Pour in some of your fine glitter. Again I didn't measure, but always go with less, then stir, & then check to see how 'saturated' it looks. Add more if needed.
Step 2:
Dip the tip of your sponge brush in the glitter mixture and apply to the glasses. I started on one arm, then the front, and lastly did the other arm. I didn't do the backside of the glasses at all, and I didn't do the 'bottoms' of the arms because I wasn't sure how comfortable the glitter would be on my ears after 2+ hours of movie ;)
Be very careful not to get it on the lenses! If you do happen to get a bit on, use a Q-tip and some warm water to try and get it off.
For the first coat, I started with a brushing motion, but figured out halfway through that I was getting better results by 'tapping' it on. I made sure it was fairly thick, not dripping, but thick enough that it looked more white than black.
Step 3:
Let it dry between coats, the longer you can leave it the better, though with these ones as soon as it was dry to the touch, I put another coat on. Try to have a spot to hang them while they dry. I used my Ottlite lol
Step 3
Add more coats until desired effect is achieved. I ended up doing 3 coats, I probably would have been fine with 2, but you guys know how much I love glitter lol
After 1 coat:
After 3 coats:
Step 4
Now's the time that, if you so desire, you can continue blinging out your specs! Add crystals! Add bows! The sky's the limit! I chose to keep these ones fairly tame, but I have every intention of breaking out my super duper Martha Stewart set of rainbow glitters and making a rainbow pair lol
Now aren't these cuter than boring basic black??
Can't wait to see what you guys come up with. Tweet me your pics @Mostly_Mandy :)
Side note: I've had this post done for a while, but I've scheduled it to publish on the day that Magic Mike hits theatres. And no, it's not being released in 3D. Unfortunately.
Hello my lovelies :) I hope you are all having a fabulous week!
Last Saturday, hubs and I went out to the PL to go visit his grandparents (Granny & Poppa) and his mom (my MIL). We had a nice visit, ate some of Granny's amazing scones, and got to talking. About sewing. I told Granny and my MIL about my good intentions and disastrous results with my first attempt, and they proceed to herd me down to the back room where all their crafty things are.
I told them I felt like I needed to start with something easier, and Granny suggested an apron. Perfect! I can make it AND use it! (It's worth mentioning that at this point I'm picturing myself in some amazingly sparkly and blinged out apron that is CLEARLY beyond my level of ability...)
Moving on...
Granny and my MIL then hooked me up with lots of valuable information for a beginner seamstress, handed me an awesome little pattern envelope by Kwik Sew (which has patterns for 2 different types of aprons, a neck scarf and a head scarf), and TONS of fabric! My MIL gave me what turned out to be a whole bolt of this decent off white fabric, and then it hit me: Curtains. (And yes, I had a Maria from the Sound of Music montage going through my mind at this thought. Don't judge me.). What could be easier than curtains!
So I did a quick Pinterest search for 'sewing curtains' and there was a Pin that lead me to this blog. I read through her tutorial and it was nicely laid out & easy to understand, so I went with it. I did my measurements, rolled out my fabric, did the little cut, followed by the tear (which I did with the gusto, panache & facial expression of a certain 80s wrestler. hahahaha I really did though lol) to make sure everything would be square.
Next I pinned, then ironed, then sewed. That's really all there was to it. I don't have them hung up yet, but here's a shot of my amazing seamstress skills:
Here's a couple of things I learned:
1. If you leave fabric laid out on the floor any flat surface, even for 30 seconds, there will be a cat on it when you return.
2. Rainbow topped pins are super cute, but if you are using them on light fabric and iron over them, your fabric will look like Sprinkle Party Cake ice cream when you take them out.
3. And just for reference:
I have the fabric cut ready to go for the second set, I just need to get started on them, which I plan to do today. Or at least by the end of the weekend. I hope. lol.
So many people have asked me why I prefer Dance Central 2 (DC2) to Just Dance 3 (JD3) for my Xbox Kinect. Let me show you why:
Party Rock Anthem on Just Dance 3:
Party Rock Anthem on Dance Central 2:
If after watching both of those videos you DON'T agree that DC2 is vastly superior, then you're a crazy person we'll have to agree to disagree. The graphics are better, the dance moves are more realistic (not to mention more challenging), and the 'upcoming moves' feature on DC2 is much easier to follow than with JD3.
And that's that! Sorry for such a short post today, I've got some projects and tutorials in the works, so I'll be updating more in the coming days/weeks :)
I've decided I'm spending the majority of my Monday going through my OVERFLOWING scrap box and using this MS butterfly punch I borrowed. Wish me (and my hands) luck :)
One of the Trending Topics on Twitter today was #10SongsILove. Since I am full on procrastination mode right now (ATCs are due tomorrow and I haven't started...), I have decided to use
Twitter as my creative inspiration once again and make a blog post about it. So without further ado,
here are 10 songs that can't get enough of right now (in no particular
order).
1. Timebomb - Kylie Minogue
2. Scream - Usher
3. Reasons - Project 46
4. Anticipate (Netsky Remix) - Skream
5. I Remember - Tristam
6. Renegade - Noisestorm
7. Come Alive - Netsky
8. Do I See Color - Adventure Club
9. Out of the Blue - Sub Focus
10. Do Ya Thang - Rihanna
There ya have it! This is what I've been shaking my ass to lately. What are you guys listening to?
For those of you that are non-gamers, you'll probably want to skip this post since I'll be talking about the second Beta Weekend Event for Guild Wars 2. You have been warned ;)
So this past weekend was the second Beta Weekend Event (BWE2) for the upcoming MMO Guild Wars 2. I also took part in BWE1 at the end of April, and will try to mesh my thoughts of both events together in this one post. Please excuse me if t comes off as a confusing mess :)
For anyone interested in more information on this game, it's features, and professions, you should absolutely check out THIS POST on GuildWars2Guru. It's a one stop shop for information, and will give you a better understanding of things I may reference here ;)
For BWE1 I played a Human Elementalist. I wasn't as focused on the profession itself because I was too in awe of the beauty of the game in general, and all the overwhelming newness of a different MMO.
I should probably take a minute here to explain that I was a pretty hardcore WoW player for almost 4 years. I was a WoW purist. Any other MMO I tried, I would always compare it to WoW and think "Why bother changing?". Well my time with WoW ran it's course (Read: Cataclysm ruined the game), and I decided it was time to take a step away from online gaming for a while.
A couple friends I played WoW with (and who quit way before me) started telling me about this new game on the horizon called Guild Wars 2. Now, I tried GW1 on a free trial and I wasn't impressed at all. You couldn't even JUMP ffs. But the more they talked about it, the more interested i got. Before I knew it I was in BWE1 and OMG was I happy I gave it a chance!
This game is BEAUTIFUL. I'm not kidding. The art department, animators, creators, EVERYONE should be proud of themselves. It took my breath away.
Divinity's Reach (BWE1)
Queensdale (BWE1)
Lion's Arch (BWE1)
Lion's Arch (BWE1)
As I said, for BWE1 I rolled a Human Elementalist. It was the obvious choice for me since it was in my comfort zone (I always played caster classes in WoW, a shaman being my main). During that event I got to enjoy and explore Divinity's Reach, Queensdale and Lion's Arch. I had a love/hate relationship with the vast number of spells (Earth, Air, Water, Fire) that were available to that profession. I guess I just didn't have enough time to play with them all, and pretty much stuck to one element while I played.
One thing I noticed right away about GW2 was that the UI is very clean, simple and out-of-the-box usable. By that I mean that GW2 has accomplished what took me lots of addons to achieve in WoW.
UI from BWE1, during combat.
UI from BWE2, out of combat. The major differences this time were the change to the minimap, and the dodge meter was moved to arc the health bubble. Love.
For this event I decided to roll something completely different: Norn Necromancer. I don't have too many bad things to say about this profession. The only thing that I didn't like was that my minion's health didn't return after combat like mine did, and that his AI was lacking. After playing an Elementalist for BWE1, it was nice to be able to try out the weapon swapping this time.
I was able to check out Hoelbrak & Wayfarer's Foothills during this event. I completed both maps:
It wasn't nearly as 'overall pretty' as the human areas, but there were still some gorgeous spots.
As for storyline, it was pretty awesome. One of my favourite lines:
For the record, she ended up kicking his ass ;)
The armor dye system makes me so happy! No more shoddy looking gear while you level! Check out a small taste of armor progression as I leveled up to 12:
In the 3rd & 4th shot, it's the same chest piece, just different dyes :)
So far my favourite area in the game is Lion's Arch. It is AMAZING! I could absolutely do a whole blog post about it, and probably will someday... Here's a quick video, it's even more beautiful at night :)
Alright, alright, I'll stop now and go do something productive. I just needed to share how amazing this is. Hopefully I'll see some of you in game :)
I have a problem, and I'm sure I can't be the only one in the world with this problem, so I'm coming out and screaming it from the hilltops so that others of my kind can join with me in unity: I AM A SCRAPBOOK PAPER HOARDER! There I said it. It's out there now.
I'm the kind of girl that goes into a craft supply shop and sees these amazingly sparkly, cute, or otherwise fantastic pieces of paper and buys them. Normally that wouldn't be a problem if I actually had a project in mind for them. BUT I NEVER DO. I see them and I lose my mind over the *insert attention grabbing detail here* and I grab it before someone else does. Oh, and never just one sheet, it has to be at least 2 , you know, in case I use one. Please tell me it's not just me that does this. Someone? Anyone? Bueller?
If you've been following my blog, you'll know that I was without my glasses for a few days and had to come up with things to keep me busy that didn't require me to see in the distance (read: No TV). One of the things I decided to do was go through my scrapbook paper collection to see what I actually have in those cases. I really do have some pretty papers! I tried to come up with card ideas, but I sell my cards, and I really wanted to keep this paper in my life, so I thought: "Hey! Why not cut out a piece of each and use them as inserts for your iPhone case!" OMG. Brilliant! I can accessorize and use some of my collection AT THE SAME TIME! Win- win! Oh shizz... AND redeem myself with a non-fail tutorial too! Win-win-win!
How to Awesome-ize Your iPhone Case
Step 1:Gather your supplies
~ Awesome scrapbook paper (try not to use anything too thick, it makes the case buldgy around your phone)
~ Scissors
~ Utility knife
~ Pencil
~ Clear iPhone case
~ Pretend that ruler is a cutting mat (I have no idea why the ruler is in the pic, and I covered the cutting mat with the paper... don't judge me)
Step 2: Use your iPhone as a pattern
Place your iPhone on the backside of your selected paper, and trace the outside of it with your pencil.
It should look like this when you are done:
Use your scissors and cut along the pencil line.
Step 3: Cut out the camera/flash hole
Fit your paper into the clear case, design side out.
Lightly press your finger against the paper under the camera hole so that you can use your pencil to trace the inside of the hole. Next, take the paper back out of the case and put it on the cutting mat. Use your utility knife to cut out along the line you just drew. Try to cut just on the outside of the line so that you don't see any overlap once the case is on. It should look like this, but neater:
Step 4: Assemble your snazzy new case!
Clean the inside of your case to get rid of any dust or glitter that might be there. Pop in your pretty paper, and then your phone. Voila! SO USEFUL!
Here's another one I did:
So there you have it! Now you can accessorize your phone to match your outfit, the season, or just whatever sparks your fancy! I'd love to see what you guys come up with! Tweet me your pics @Mostly_Mandy or post links to your creations in the comments section :)
I hope you enjoyed this tutorial! It went much better than my last one did lol
This is by far one of my favourite cards I've ever done. I love this stamp so much! It's by Whimsy and it's called Mystic. I purchased mine at Carousel Rubber Stamps.
As I said, the unicorn stamp is by Whimsy, the Happy Birthday was actually a freebie clear stamp that was part of a set that came with a magazine. I used them ALL the time! I used Copics to color her in (now that I have my greys, I might go back and do a little more shading on her body), the charms were from Michael's, and I used Stickles for the glitter accents. Oh, and I used my Spellbinders to die cut the Happy Birthday pieces.
I'm planning to make a few more of these which will be for sale in my Artfire Studio. If you'd like to preorder, please feel free to comment here or message me on Twitter @Mostly_Mandy :)